Ubuntu (Hardy): Install Apache 2 Server

Setting up Apache 2 server on Ubuntu Hardy is pretty easy.

sudo aptitude install apache2 apache2.2-common apache2-mpm-prefork apache2-utils libexpat1 ssl-cert

Note:

I choose apache2-mpm-prefork (single thread) over apache2-mpm-worker (multi-threaded requests). This is because mod_rails may work with apache2-mpm-worker, but is only currently tested to work with apache2-mpm-prefork.

ServerName

Edit your apache configuration file:

$ vim /etc/apache2/apache2.conf

At the end of the file add the following:

ServerName your_server_name

And restart your server:

$ sudo apache2ctl graceful

Note:

If you get the following error when restarting Apache it means that you didn’t succeed in setting the ServerName:

apache2: Could not reliably determine the server's fully qualified domain name, using 127.0.0.1 for ServerName

Test

Start your prefered browser and open your server ip address (e.g. http://127.0.0.1), you should see something like this:

It Works!

Or use curl (command line is always better):

$ curl http://127.0.0.1

You should see:

<html><body><h1>It works!</h1></body></html>

It Works!!!

Ubuntu (Hardy): Install Apache 2 Server

Ubuntu: Disable That Annoying Touchpad Click

In my opinion, one of the worse inventions since “PC”, is the annoying (and I’m been respectful) Touchpad. Not only it takes you out of your home row (keyboard), or the fact that you need like two passes for reaching corners. But because it really &*^#$%^*$ annoys me when typing accidentally make a click.

Lucky me… there’s a way to disable Touchpad-Click. Simply go to System > Preferences > Mouse, click on Touchpad tab, and uncheck: Ennable mouse clicks with touchpad.

So long Touchpad-click!!!

Ubuntu: Disable That Annoying Touchpad Click

Texinfo: Writing Plain Spanish

After a few weeks of researching we finally decided for Texinfo as our technical writing platform of choice. But before we did the switch, there was a serious complain about Texinfo: The inability to write plain spanish!!!

For us results really odd to write @’a for an a with accent, we still prefer á. So we found a workaround from Vladimir Támara (http://www.geocities.com/sl_edu_colombia/soluciones/vladimir/linux_esp.html), that used sed to replace all accents in our original texi file.

So here’s the howto:

Step 1

Create a file called encodetexi.sh (or name it whatever makes sense for you), and put the following bash code in it:

#!/bin/bash
sed -f <b>encondetexi.sed</b> $1 &gt; tex/$1

This script will encode your accents to the formal Texinfo way with sed, and put them in the subdirectory tex/ (don’t forget to create it or change the script to handle the new subdir creation).

Once created give execute permitions to the script:

chmod 775 encodetexi.sh

Step 2

Create a file named encodetexi.sed which contains the substitution patterns for sed. Here is the content of the file:

s/á/@'a/g
s/Á/@'A/g
s/é/@'e/g
s/É/@'E/g
s/í/@'{@dotless{i}}/g
s/Í/@'I/g
s/ó/@'o/g
s/Ó/@'O/g
s/ú/@'u/g
s/Ú/@'U/g
s/ñ/@~n/g
s/Ñ/@~N/g
s/ü/@\"u/g
s/Ü/@\"U/g

This will replace all accents, tildes, etc. from our original texi file and create a well encoded file in tex/ subdir.

Step 3

Now plunge your texi files in plain spanish, use accents and tildes at will.

Step 4

Run the script (again, make sure you got tex/ subdir):

$ encodetexi.sh your_file.texi

Final thought

Funny… after revisiting this post it would make much more sense to be written in spanish :|

Texinfo: Writing Plain Spanish

Ubuntu (Gutsy): Change Default Keyring Password

I changed my user password in Ubuntu, everything was OK until the next time I booted my Linux box. Keyring Manager was asking me for a password (as my wireless connection needed stored WPA password), immediately figured out that this was caused by the password change.

The problem is that Gnome Keyring manager doesn’t have an option to change the default keyring password. So, if your user password is changed, every time you log in Keyring Manager will ask for the password you supplied during Ubuntu’s installation (awkward).

Due the lack of password change in Keyring Manager we need another application: Seahorse. To install type the following:

$ sudo apt-get install seahorse

Once installed open it (Applications -> Accessories -> Passwords and Encryption Keys), and then go to Edit -> Preferences menu. Select GNOME Keyring tab and change the password to match your actual Linux user password.

Keyring Manager

Ubuntu (Gutsy): Change Default Keyring Password

Ubuntu (Gutsy): DynDNS Client Setup

Hello again, this time we’re going to setup a DynDNS client so your computer/server can be reached from anywhere.

Step 1

First, you need to create an account with DynDNS to do so follow this howto: https://www.dyndns.com/services/dns/dyndns/howto.html.

Step 2

First we’ll install ssh and ssh-socket so we can send our DynDNS user and password encrypted instead clear text:

$ sudo apt-get install ssh libio-socket-ssl-perl

Step 3

Install ddclient:

$ sudo apt-get install ddclient

Step 4

The installation will prompt you some questions. For the first one it ask for your dynamic DNS provider, select http://www.dyndns.com:
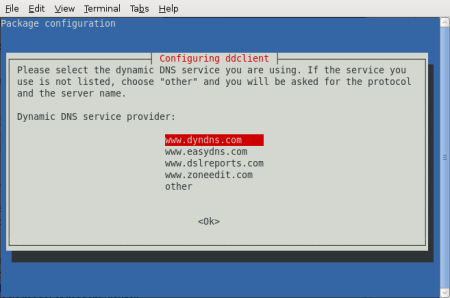
ddclient01.png

Then, put your fully qualified domain name(s):

ddclient02.png

Now, your DynDNS requistered username and password:

dcclient03.png

ddclient04.png

And finally, type “web” as the DynDNS interface to use:

ddclient05.png

Ok, so long we’ve finished installing ddclient but there’s still more work to do in order to get it working properly.

Step 5

We, need to change the ddclient configuration file (/etc/ddclient.conf) in order to use ssh to send the username and password, and to properly check the IP adrress. From the command line open ddclient configuration:

$ sudo vim /etc/ddclient.conf

In the generated configuration file you’ll probably see something like the following (The parts in italics will be different, the bold parts are going to change so special attention on this):

# Configuration file for ddclient generated by debconf
#
# /etc/ddclient.conf
pid=/var/run/ddclient.pid
protocol=dyndns2
use=if, if=web
server=members.dyndns.org
login=your-dyndns-username
password='your-dyndns-password'
your-host-name.homelinux.net

Step 6
We need to change the configuration so ddclient get our public IP address properly, and to send our username and password over ssh.

DynDNS has a web interface to get your public IP address, this is equivalent to manually invoking http://checkip.dyndns.com/. But we need to properly configure this interface, so change the line use=if, if=web for the following:

use=web, web=checkip.dyndns.com/, web-skip='IP Address'

Second, add to your configuration file just below the initial comments the following:

ssl=yes
daemon=300

The above two lines tells ddclient to use ssl for its connection and to update your public IP address every 5 minutes (specified in secconds).

Step 7

Now, we must make sure that ddclient is set to run as a deamon. Edit /etc/default/ddclient:

$ sudo vim /etc/default/ddclient

And make sure that:

# Configuration for ddclient scripts
# generated from debconf on Tue Jan 29 20:23:32 CST 2008
#
# /etc/default/ddclient
# Set to "true" if ddclient should be run every time a
# new ppp connection is established. This might be useful,
# if you are using dial-on-demand
run_ipup="false"
# Set to "true" if ddclient should run in daemon mode
run_daemon="true"
# Set the time interval between the updates of the dynamic DNS name in seconds.
# This option only takes effect if the ddclient runs in daemon mode.
daemon_interval="300"

Step 8

Finally, restart your ddclient and if no error is printed you’re good to go:

sudo /etc/init.d/ddclient restart

Port Forwarding

In order to deliver services on the net, you must open the corresponding ports for the services that your computer/server will provide, this is called Port Forwarding. Unfortunately this howto does not cover that topic. To do so you can visit http://www.portforward.com/routers.htm, where you can read how to port forwarding for your specific model of modem/router.

Happy hacking!

Ubuntu (Gutsy): DynDNS Client Setup

Linux: Configuring a Server for Static IP

This mini HOWTO explains the required configuration for a static IP.

Before proceed we must know the following configuration of our network:

  1. The IP Address to be used for our server;
  2. Netmask of our network;
  3. Broadcast IP address; and
  4. The gateway IP address.

First, we must open for edit the file /etc/network/interfaces:

$ sudo vim /etc/network/interfaces

Once there, we must find the network interface to be configured from a dynamic IP address to a static one. In this case it will be eth0:

auto eth0
iface eth0 inet dhcp

In the above example we can see that the interface eth0 is configured for dhcp (dynamic address). To change to static IP address configuration we must set the following:

auto eth0
iface eth0 inet static
address 192.168.1.2
netmask 255.255.255.0
nerwork 192.168.1.0
broadcast 192.168.1.255
gateway 192.168.1.254

Finally, we restart networking services:

$ sudo /etc/init.d/networking restart

And that’s it, we’ve now our server configured for static IP address.

Happy Hacking!

Linux: Configuring a Server for Static IP

Configuring 2Wire as a Bridge

This HOWTO helps you to set your 2Wire ADSL modem as a brifge.

I was faced to use a 3com router over 2Wire ADSL modem cause it supports content filtering. We required this functionality to avoid users from browsing freely on the web, but 2Wire modems doesn’t support that functionality. So we’ve set our 2Wire ADSL modem as a bridge and let our 3com router to handle the Internet connection.

This is not the last time that we’ll tell you: WARNING!!! This is and advance topic and we assume that you know what you’re doing.

Step 1

To set our 2wire modem as a bridge first open Firefox (or the browser of your choice) and enter enter the following address: http://gateway.2wire.net (if you can’t access this page try http://192.168.1.254).

Step2

Once there, click on Broadband Link, located on the top of the page as a tab (the second one).

2wirebridge-01.jpg

Step 3

Now click on Advanced Settings from the same menu bar (if a password is requested provide it).

Under the section DSL and ATM:

  1. For the ATM Encapsulation parameter select Bridged LLC option.
  2. And for the ATM PVC Search parameter select the option Disabled.

Under the section Broadband Network:

  1. In the Connection Type parameter select Direct IP (DHCP or Static) option.
  2. And leave blank the Username, Password and Confirm Password textboxes.
2wirebridge-02.jpg

Step 4

Enter the following address: http://gateway.2wire.net/mdc or http://gateway.2wire.net/management (or http://192.168.1.254/mdc).

Once there click on the Configure Services link in the Advanced section from the vertical menu located on the left of your window and disable the option Enable Routing (unchecked) to set your modem as a bridge.

2wirebridge-03.jpg

Now check that the Power, Network and ADSL leds on your modem are turned on and green, and your Internet are turned off or orange (depends on the model).

And that’s it. Your 2Wire modem as a bridge!!!!

There’s another way to set your modem as a bridge, but is a trick… quick and dirty. To do so simply go to the Broadband Link options and click on the Advanced Settings from the menu bar (seen on step 3), and type a completely wrong Username and password for your connection (say x for the user and x for the password) and that’s it!

Yeah, quick but too dirty for a formal configuration.

Configuring 2Wire as a Bridge